Top 30 Geometric Henna Patterns: Ultimate Collection with Tutorials
- sarah makhluf
- Aug 18, 2025
- 9 min read

Geometric henna patterns are becoming a favorite in modern mehndi design. Their clean lines, structured henna patterns, and perfectly symmetrical mehndi layouts create a striking look that stands out. From delicate triangles and grids to bold mandala-inspired pieces, geometric mehndi designs are ideal for anyone who loves balance and precision. In this ultimate collection, you’ll find 30 creative ideas to explore, including front hand simple mehndi design, advanced mathematical henna designs, and everything in between.
We’ve also included helpful steps to guide you through each look, so you can try them yourself, whether you’re new to henna or already obsessed.
Finger Band Geometry

A sharp and minimal geometric henna pattern featuring bold square bands and symmetrical leaf vines down each finger.
You’ll need: Henna cone with fine tip
Steps:
Draw a clean square band around each finger
Add a simple center motif inside each square
Outline with dots or short lines
Extend a small leaf stem below the square
Puzzle Grid

This professional henna pattern uses alternating grids, deep saturation, and clever spacing to create an almost optical illusion.
You’ll need: A ruler-straight hand, high-contrast cone, and a game plan before you start filling in squares
Steps:
Draw a full grid with neat spacing
Map out a repeating checkerboard base
Add darker overlays for the bold quilted effect
Fill every block with care
Layered Diamond Palm

A bold and balanced geometric mehndi design featuring stacked diamonds on the palm and linear fingertip accents.
You’ll need: Henna cone with fine tip
Steps:
Draw a small square in the center of the palm
Add layered diamonds outward with even spacing
Use triangle edging for a jagged outer border
Finish with lined bands and tiny triangles on each fingertip
Checkerboard Pattern

A detailed and elegant geometric mehndi design featuring a full-hand checkerboard filled with small symmetrical shapes.
You’ll need: Henna cone with fine tip, steady hand
Steps:
Draw a neat grid of squares across the back of the hand
Fill each square with a different mini motif (flowers, dots, lines)
Keep the spacing consistent for a uniform look
Add curved detailing near the wrist to finish
Optical Grid Illusion

A striking mathematical henna design made entirely from clean lines and precise square placement for a modern, structured look.
You’ll need: Henna cone with extra-fine tip
Steps:
Start at the wrist and draw evenly spaced horizontal lines across the hand
Add vertical lines from the side to form a full-hand grid
Fill alternating squares with henna to create a pixelated pattern
Wrap lines around the fingers to maintain flow
Keep the rest of the design bare for contrast
Layered Triangle Maze

An intricate geometric mehndi design built from layered triangles, bold lines, and a floral centerpiece for a fully framed effect.
You’ll need: Henna cone with fine tip, reference lines for guidance
Steps:
Start by drawing a square with a floral motif in the center of the palm
Surround it with a series of straight and diagonal lines to create layered boxes
Fill each triangular section with dots, leaves, or zigzags
Add straight parallel borders to frame each layer
Repeat triangle and leaf elements on the fingers to complete the design
Triangle Web

This design features layered triangle outlines filled with delicate symmetrical detailing across the backhand.
You’ll need: Henna cone with ultra-fine tip
Steps:
Start with a large triangle pointing toward the wrist
Add nested triangle outlines inside, keeping spacing even
Fill each layer with patterns like dots, grids, and leaf borders
Mirror the triangular style on each finger
Finish with tiny dots and diamond accents to connect sections
Checkerboard Palm Design

This unapologetically graphic geometric mehndi design turns your palm into a statement piece. Simple shapes meet strong contrast for maximum impact.
You’ll need: Henna cone with flat, steady pressure
Steps:
Draw evenly spaced horizontal and vertical lines to create a grid
Fill every other square to create the checkerboard effect
Repeat the same block pattern on the fingers for full balance
Floral Frame Grid

This dreamy geometric mehndi design mixes structured square outlines with soft petal-inspired cutouts. It’s like lacework for your hand, with just the right touch of symmetry.
You’ll need: Henna cone with fine and medium tips
Steps:
Outline three or four neat squares across the back of the hand
Fill each one with a different pattern: petals, spirals, or swirls
Use negative space (leave skin untouched) to shape bold flowers
Add borders and tiny filler shapes between the squares
Complete the look with matching fingertip and knuckle detailing
Abstract Linework

Perfect for those who love structure with a twist.
You’ll need: Henna cone with a steady medium-thick tip
Steps:
Draw diagonal and horizontal lines across the hand and wrist
Double each line and fill the gap with henna
Add tiny dots around every strip for contrast and rhythm
Decorate select fingers with spirals and vertical line stacks
Tribal Triangles

The triangle-and-diamond mix creates a woven, bracelet-like look that feels sharp and confident.
You’ll need: Henna cone with firm, consistent pressure
Steps:
Draw two wide diagonal bands across the back of the hand
Fill one with stacked triangles and the other with alternating diamonds
Add thin parallel lines above and below each band for clean edges
Include a few drop-shaped flourishes at the corners to soften the look
Finish with a single matching strip on the finger for balance
Dot and Chevron Fingers

This minimalist geometric mehndi design blends bold lines, stacked arrows, and scattered dots for a tribal-meets-editorial look.
You’ll need: Henna cone with ultra-fine tip, optional yellow tint for accents
Steps:
Start by drawing vertical chevron-style arrows down each finger
Fill the center finger with a dotted oval and surrounding dots
Add slashes, grids, and stacked lines to break up the flow
Floral Grid Palm

A timeless choice with a sharp modern finish.
You’ll need: Henna cone with fine and medium tips
Steps:
Draw a rectangle or trapezoid to frame the center of the palm
Fill it with a repeating six-petal floral pattern inside a grid
Add diagonal hatching around the border for texture
Cap each fingertip with bold black fill and dot clusters beneath
Star Grid

Perfectly aligned for that clean, mathematical henna design look.
You’ll need: Henna cone with a wide tip and a dotting tool or fine tip
Steps:
Draw a grid of squares across the entire palm and fingers
In every other square, carve out a five-point star with clean angles
Fill the background around each star with solid henna for contrast
Add perfectly spaced dots at the center of each empty square
Diamond Maze

The repeating diamonds and angled fillers showcase the precision.
You’ll need: Henna cone with medium tip and confident linework
Steps:
Start by mapping a central diamond across the palm and build outwards
Fill each diamond with either a dot cluster, zigzag, or nested square
Add diagonal and horizontal bands to frame the layout
Extend the design to the fingers with matching diamond stacks
Finish the upper wrist with symmetrical mehndi motifs or V-shapes
Diamond Petal Fingers

The dotted outlines bring in that classic symmetrical mehndi touch.
You’ll need: Henna cone with fine tip for dot detailing
Steps:
Draw a bold diamond on each finger joint and add a four-petal motif inside
Surround each diamond with neat dots to form a soft border
Finish by connecting the look with matching bands or cuffs at the base
Half-Palm Geometry

A perfect example of a balanced, modern mehandi look.
You’ll need: Henna cone with fine and ultra-fine tips
Steps:
On one side of the palm, draw a clean grid filled with six-petal floral repeats
Outline the other half with scalloped borders and traditional filler work
Use tiny florals and paisleys to bridge both sections seamlessly
Carry the structured henna patterns up the fingers in small panels or tiles
Finish with wrist cuffs or floral bands
Diamond Cluster

This tiny-but-mighty henna pattern is all about sharp angles and symmetry.
You’ll need: Henna cone with extra-fine tip
Steps:
Draw a central hourglass shape made from two stacked triangles
Add small diamond motifs at the top, bottom, and sides
Decorate each shape
Floating Floral

The clean spacing and soft symmetry give it a delicate, polished finish.
You’ll need: Henna cone with medium tip and steady pressure
Steps:
Draw six to eight tilted squares flowing diagonally across the hand
Fill each square with a different motif
Leave space between tiles to emphasize the grid-like layout
Hexagon Highlights

This design brings together sharp outlines and elegant fills.
You’ll need: Henna cone with medium tip and a light hand for detailing
Steps:
Start with two main shapes: a hexagon at the palm’s center and a downward triangle at the base
Fill both with clean inner patterns
Wrap the fingers with coordinated paneling and leafy lines, keeping the symmetry tight
Cap each fingertip with a solid stain
Diagonal Floral Net

The gridwork creates a true mathematical henna design feel, while the surrounding curves keep it beautifully feminine.
You’ll need: Henna cone with fine tip for mesh detailing
Steps:
Create a diagonal net across the back of the hand using crisscrossed lines
Fill each intersection with a small petal or leaf to form a floral lattice
Frame the mesh with scalloped borders and bold flower outlines
Art Deco Angles

This edgy mehndi design channels an Art Deco vibe through sharp angles, layered arcs, and structured linework.
You’ll need: Henna cone with both thin and thick control
Steps:
Draw a strong zigzag or lightning-like line across the hand as your central divider
Fill the space above with layered arcs and half-circle line textures
Add structured borders and sharp angles around the wrist and finger
Decorate with small dots and directional accents
Grid of Moons and Dots

A flawless blend of minimalism and mathematical henna design precision.
You’ll need: Henna cone with thick fill and a dotting tool
Steps:
Draw a full grid of evenly sized squares across the palm and fingers
Fill alternating squares with bold crescents or central dots
Keep spacing clean to highlight the negative space and symmetry
Leaf-Frame

The leaf-trimmed frame and layered arc fills create a look that’s both sharp and soft.
You’ll need: Henna cone with both fine and thick lines for contrast
Steps:
Outline a bold rectangular L-shape frame along the side and top of the hand
Fill the inside with repeating semi-circle arcs, leafy shapes, and dotted borders
Add leaf borders and small accents to the thumb and outer edges
Wrap the fingers in layered circular fills to mirror the palm design
Criss-Cross
This advanced mehandi design turns simplicity into a statement.
You’ll need: Fine-tip cone for precision leaves and floral outlines
Steps:
Start with a bold floral motif at the base of the hand
Build a criss-cross net using thin diagonal lines
Fill each segment with petite leaf patterns
Keep the fingers minimal for a clean finish
Delicate Drama

This look blends deep black fingertips with precise detailing in rust tones.
You’ll need: High-stain henna cone, steady lines, and patience for shading
Steps:
Fully coat fingertips with deep black henna
Add curved arches and teardrop motifs around the finger creases
Use negative space to highlight symmetry and contrast
Woven Elegance

The clever latticework mimics woven thread, creating a sleek, minimalist effect with geometric appeal.
You’ll need: A fine-tipped cone, even pressure, and a steady rhythm for spacing
Steps:
Start with diagonal lines across the hand
Add evenly spaced loops to mimic interlocking links
Keep the negative space clean for that crisp finish
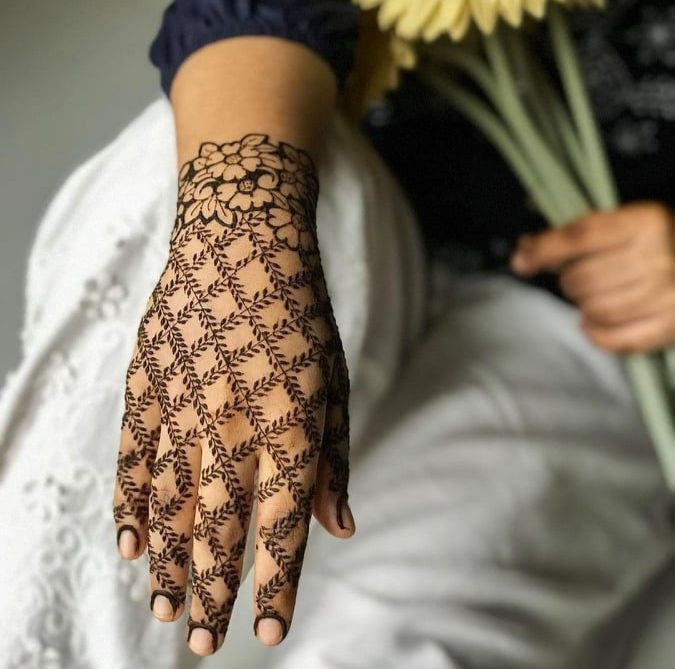
Elegance in Every Line

The crisp diamonds, tiny dots, and bold leaf tips create a rhythm that feels almost embroidered.
You’ll need: A steady hand, fine-tip cone, and dark henna paste for contrast
Steps:
Draw evenly spaced diagonal grids
Outline the diamond edges with ridged borders
Add leaflets inside each square
Highlight with bold dots and fine finger details
Graphic Grid

It’s bold, hypnotic, and a total statement-maker.
You’ll need: A flat-tip cone or brush, a ruler-like eye, and plenty of patience
Steps:
Sketch vertical lines across the palm
Add evenly spaced horizontal strokes to form squares
Fill each box neatly with thick henna
Storybook Mehendi

The framed vase, delicate vines, and dainty florals scattered across the palm feel straight out of a miniature painting.
You’ll need: A fine cone tip, smooth control for curves, and a reference image for the central motif
Steps:
Outline the center square and vase
Fill with lace-style floral detailing
Decorate fingertips and fingers with simple buds
Scatter mini blossoms around the hand
Are You Ready to Get Started?
Geometric henna patterns bring a striking blend of symmetry, structure, and bold design. Whether you prefer mathematical henna designs or sleek geometric mehndi designs, these looks offer endless inspiration for anyone drawn to precision and artistry.


